Monday, October 7, 2013

How to do Chalkboard Art if your NOT Artistic;)


I'm definitely not artistic, and my handwriting and printing is absolutely horrible but I LOVE chalkboard paint, and really wanted to actually have drawings or/and writing on my chalkboard wall. So after trying numerous times to draw pictures or write sayings on my chalkboard wall, and constantly erasing them because they always looked horrendous I really wasn't sure what to do with my chalkboard wall in my kitchen.  I was seriously contemplating painting over it and being done with my chalkboard wall.  But this little tool solved my problem....
A projector!  It was actually my husband's idea, he told me to find a picture on the internet that I liked and to project it on to the wall then trace it with chalk.  Ok, so maybe this isn't a new idea, but it was definitely new to me.  I hadn't heard of anyone doing this and thought it was the BEST idea EVER!!! My husband has a projector, but you could rent one from a computer store or even borrow one from your work or ask a friend.  I had this idea in my head that I wanted a cowboy on my chalkboard, so I googled "cowboy silhouettes"  and I found tons.  I wanted just a black and white cowboy face silhouette.  I would fill in the negative space with chalk.  My dad helped me with this, I must admit as I initially thought because of my lack of artistic ability I wouldn't be able to do it, but then as we started I realized how easy it was.  

Here is the first picture I found online.....this one was unsuccessful as it had too much negative space and the features just weren't clear with the chalk.  I didn't take a picture of it on my chalkboard because to be honest it didn't turn out well, we really needed more positive space, to really see the details of the illustration. 
Ok so we moved on to the next picture, which I also just found by googling "cowboy silhouette"  
I didn't use the writing just the image.  I made the image larger by expanding it on my computer and also moving the projector further away from the chalkboard. 

My dad simply traced the red negative space of the cowboy with chalk.  We added the stars on the bottom of the image and didn't include the writing that was with the image.  We even searched google for the "COWBOY" writing and the "WHISKY" writing and also traced this.  Since it was our first time doing this it took a bit of time to sort out the projector, make the image the proper size and make sure that the writing was level.  But after it was all done it turned out better than I expected!  

I wanted the image to stay up on my chalkboard for a while so I my dad told me to use a spray fixative. I found this at a local art supply store.  A fixative is usually used for carcoal paintings but thought it would work for this purpose. This is a permanent solution for having the chalk stay in place, so you would have to repaint a coat of chalkboard paint when you want to change the image. 

However, if you use hairspray and spray the image with it, this will also keep the chalk in place, and you can simply wipe with a damp cloth when you want to remove the image.  The only reason I didn't use hairspray it because it makes the image a bit shinny and splochy with shinny batches if you don't do  an even coat over the entire chalkboard.  I think I am going to leave this up for at least 6 + months so I don't mind having to repaint it with chalkboard paint.  

Saturday, September 7, 2013

Another Refurbished Piece;)

BEFORE 
AFTER
 
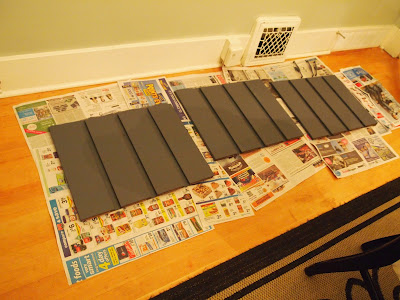
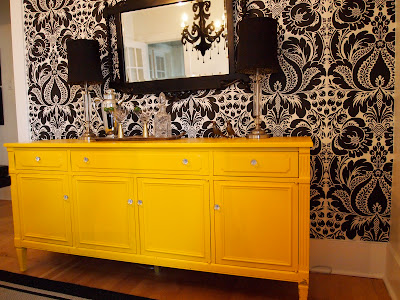
Here are the steps in between.  I bought this piece for $50 at a used furniture store and took off the cupboards to paint them....but then I noticed how cool it looked without the cupboards and left them off to expose the wood. I liked the contrast between the painted grey and the natural wood.  Here are the steps that went into this piece...

Step 1: Wipe Down with a Damp Cloth and Let Dry
Step 2: Take Cupboards Out and Hardware Off. 
I always take the cupboards out and put them on newspaper.  I also always take the knobs off, even if I am planning on using them.  You could tape them off if you wish.  I take them off and paint them separately, or keep them with the original metal and then put them back on at the very end.  
Sorry the light in the room where I painted it is VERY yellow:(
Step 3: Start Priming
I used a dark primer because most of what I paint are dark colours, so then I don't need as many coats of paint.  Just pick a primer at your local hardware store and then they can put a dark tint in it.  I don't sand the wood, I used to manually sand it with a light grid sanding pad, but not anymore, because when you dust/clean it makes for a rougher surface and sometimes small fibres of cloth get stuck in the wood. I use a painting tray and a small paint roller.  I try to use the roller as much as I can, because it's much faster and also there are no paint brush marks.  Priming the wood before painting it will help prevent chips and create a seal on the wood so the paint won't soak into the wood. 
This is the dark tinted primer but you could definitely just use a
white primer, or whatever you have on hand:)
I started priming this piece with a small paint roller. Make sure to just do
a thin coat, if the coat is too thick it will be rough on top, and you
will have to lightly sand it and repaint:(
Here are the cupboard doors taken off and being primed.  You could
leave them on if you wanted, but I just find it easier this way.
Step 4:  Let Dry. They usually say for at least 8 hours.
Then this is when you would do about two coats of your favourite paint colour.  Let each coat dry for at least 8 hours.  For a really nice coverage you will need a good two coats of paint on top of the primer.  For some reason I loved this dark grey primer color so I just used the primer for the second coat and didn't even put paint on top. Just two coats of primer for me this time. I have never done this before (just used primer) but it turned out really nice:)

Step 5:  Oil the Wood
Because I was leaving the wood exposed, I wanted to shine it up a bit.  Also there were a few chips so I wanted to try and hide these.  My husband had some tinted oil finish in the garage so I used this. I wore gloves and put some on an old rag and just rubbed it in. I couldn't believe the difference it made!! 

 Even though this cabinet isn't a solid wood, it's plywood with a laminate
on top, this still worked really well.


The oil definitely helped lessen the appearance of scratches and nicks in the wood.
Before....
After.....
You can still see the scratches a bit, but it definitely made them a lot less
noticeable.
Step 6:  Normally you would put the doors and hardware back on.
However, I really liked the look of the exposed wood inside.  So I just left the doors off and filled the open cupboards with glasses to put in my dining room!
Finished!!!


Sunday, May 26, 2013

Playing with Paint!

I was in Chintz the other day, which is a high end furniture store in Vancouver.  I saw some amazing furniture that really inspired me.  I usually just paint my furniture one colour, but I saw some pieces with really neat designs, like checkers and stripes, and that got me thinking......I really need to try this!  So I bought an old dresser and the project began!
Here is the before picture.  Unfortunately, I was so eager to get started that I already took the handles off when I realized I should take a picture first.  So here it is without the handles and the top primed.
refurbished dresser
Before
refurbished dresser
Getting ready to be primed.  I always take the handles off, and cupboards
out before painting them.  I always prime first, with paint primer.  Doing
this will allow the paint to adhere better to the wood, and resists
chipping in the future.  You will also use less paint as the primer
creates a seal so the paint won't soak into the wood.   
This was definitely the hard part-measuring! I used painters tape to section
off the black and white stripes.  I used regular semi-gloss paint.  I pulled
out the cupboards and did them separately, so the top and sides of
the cupboards would be painted.  It took two coats of paint and I tried
 to use a small roller (3 inches) so that there wouldn't be
many brush stroke lines.  
refurbished furniture
Primed cupboards are in the dresser, and now I'm just trying to match
all the lines together!
I took the handles off to paint them separately, as
I like the look of the black against the white.
Sometimes I change out the handles if they are not
that nice, but I liked these,  so decided to just
paint them!

Finally Finished!  Measuring up the stripes was definitely more work than
any other piece I have done, but it turned out alright.
Next time I am definitely going to do more stripes,
but for the first time I wanted to keep it
relatively simple:)

Tuesday, May 7, 2013

My Love Affair with Chandeliers!


Ok, so I have a bit of an obsession with Chandeliers. I have several in my house, and LOVE them. They add so much drama to a room and give that extra detail.  Light fixtures are an important aspect of a room, dated light fixtures will date a room no matter how modern your furniture and accessories might be.  You don't have to spend a fortune on light fixtures.  Going into high end light fixture stores can be a bit overwhelming and is an easy way to blow your renovation budget.  Most of my chandeliers are from home hardware stores, like Home Depot or Rona.  I spray painted both of my Home Depot chandeliers, as they were a dark brown, rustic colour, and I wanted a more dramatic and classy look.  I spray painted one chandelier white and the other black before preforming the labour intensive job of putting the glass crytals on the chandeliers (this takes hours as they usually do not come assembled).  None of my chandeliers are crystal but they do have glass pendents, which still look classy.  I tried a plastic chandelier but it just looked too cheap. I like the glass pendents because they still look expensive.  

Kitchen Chandelier....
cheap light fixture
Spray painted Home Depot Chandelier, less than $200
Glass Crytals not real crystals look expensive but are
an more budget friendly option.
Kitchen Chandelier...need some writing on that
chalkboard painted wall though:)

Bathroom Chandelier....
home depot chandelier
Chandelier, a smaller size than the above kitchen chandelier but the
same style, spray painted white.
white chandelier
Bathroom Chandelier less than $100, Home Depot.

Dining Room Chandelier.....
plastic chandelier
This one is a bit more modern, it's made out of
plexi-glass,with black glass pendants.  It was a
Christmas gift from my parents.
dining room chandelier
Dining Room Chandelier

Finally, a chandelier in the bedroom.....
Hardware store chandelier
Rona Chandelier, less than $100.

Others that I love....and wish I had....


Classy and elegant, Pottery Barn, $449.00
Amazon, Crawford 4 Bulb Chandelier, $135.99
Amazon, Crystal Teardrop
Mini Chandelier, $106.20

WOW soooo dramatic!  Amazon, French Empire Crystal
Chandelier, $297.00
Light In the Box, Modern Candle Crystal Chandelier
$374.99
light fixture
Wrought Iron Crystal Chandelier, Amazon $99.00


Tuesday, February 12, 2013

Is Mirrored Furniture here to stay?


Mirrored furniture is such a great modern yet elegant decor scheme.  I love how classy and elegant it is.  It is a modern twist on the decor phenomenon of the  1920's and 1950's.  It's great when old design ideas reincarnate themselves into new creations!  
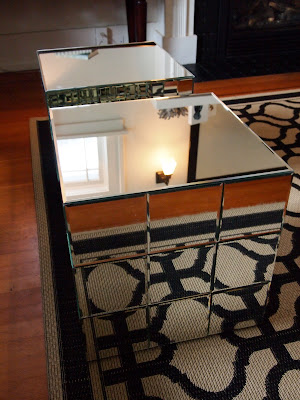
             Mirrored furniture can be very expensive; however, as time passes it is becoming more and more reasonable.  Scroll down to see some images of mirrored furniture at reasonable prices.  I found my mirrored side tables on craigslist.
              Mirrored furniture is now available as side tables, coffee tables, console tables, dressers, nightstands, TV stands and China cabinets.   Any form of mirrored furniture is such a great investment piece to have in your home.  I'm sure that it will stay in style for a while because it has been around for so long and the classy pieces have never gone out of style!  The key to decorating with mirrored pieces is not to go overboard, one of two pieces are plenty and will give your room a modern not dated look.
mirrored cubes
I think these mirrored cubes give a bit of a modern look to a room with
mostly refurbished furniture.  I found these on craiglist, but they
are originally from The Cross in Vancouver.
mirror table, mirrored cubed table
Craigslist $250 for the pair.
mirror wall sconce
Mirrored Wall Sconce in the nook where back in the
day was once the place for a telephone.
mirror decor
LOVE wall sconce from Urban Barn.

Some great mirrored pieces that I wish I had......

mirrored furniture, mirrored dresser
Very elegant and girly.  Hayworth Vanity, $299.99 Mirror $149.99
 Pier 1 Imports
WOW so classy looking!   Very old Hollywood.
Sleek lines make this nightstand classy, elegant and
modern looking.
Very romantic! Romano Mirrored Dressing Table,
Home Direct365, Euros 369.97
Pier 1 Imports
Simple and modern looking. Hayworth Nightstand,
Pier 1 Imports $199.99
z gallerie
Very nice details on the legs and front of this console table.
Sophie Mirrored Console Table, Z Gallierie $499.99
mirrored furniture, Overstock
Hand Painted Mirrored Drawer Accent Chest, Overstock $587.69
mirrored nightstand
Love the detailed legs on this nightstand.  Mirrored Nightstand,
Ebay, set of two $939.06
mirrored cabinet
Very modern looking with the sleek, straight lines.
Mirrored side table, mirrored nightstand
Loving the old Hollywood feel of this side table.  Hollywood Regency
Mirrored Nightstand, Ebay $398.00