BEFORE
AFTER
Here are the steps in between. I bought this piece for $50 at a used furniture store and took off the cupboards to paint them....but then I noticed how cool it looked without the cupboards and left them off to expose the wood. I liked the contrast between the painted grey and the natural wood. Here are the steps that went into this piece...
Step 1: Wipe Down with a Damp Cloth and Let Dry
Step 2: Take Cupboards Out and Hardware Off.
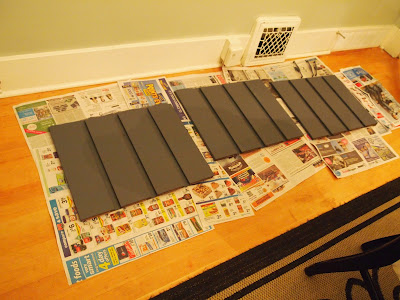
I always take the cupboards out and put them on newspaper. I also always take the knobs off, even if I am planning on using them. You could tape them off if you wish. I take them off and paint them separately, or keep them with the original metal and then put them back on at the very end.
 |
| Sorry the light in the room where I painted it is VERY yellow:( |
Step 3: Start Priming
I used a dark primer because most of what I paint are dark colours, so then I don't need as many coats of paint. Just pick a primer at your local hardware store and then they can put a dark tint in it. I don't sand the wood, I used to manually sand it with a light grid sanding pad, but not anymore, because when you dust/clean it makes for a rougher surface and sometimes small fibres of cloth get stuck in the wood. I use a painting tray and a small paint roller. I try to use the roller as much as I can, because it's much faster and also there are no paint brush marks. Priming the wood before painting it will help prevent chips and create a seal on the wood so the paint won't soak into the wood.
 |
| This is the dark tinted primer but you could definitely just use a white primer, or whatever you have on hand:) |
 |
| I started priming this piece with a small paint roller. Make sure to just do a thin coat, if the coat is too thick it will be rough on top, and you will have to lightly sand it and repaint:( |
 |
| Here are the cupboard doors taken off and being primed. You could leave them on if you wanted, but I just find it easier this way. |
Step 4: Let Dry. They usually say for at least 8 hours.
Then this is when you would do about two coats of your favourite paint colour. Let each coat dry for at least 8 hours. For a really nice coverage you will need a good two coats of paint on top of the primer. For some reason I loved this dark grey primer color so I just used the primer for the second coat and didn't even put paint on top. Just two coats of primer for me this time. I have never done this before (just used primer) but it turned out really nice:)
Step 5: Oil the Wood
Because I was leaving the wood exposed, I wanted to shine it up a bit. Also there were a few chips so I wanted to try and hide these. My husband had some tinted oil finish in the garage so I used this. I wore gloves and put some on an old rag and just rubbed it in. I couldn't believe the difference it made!!
 |
| Even though this cabinet isn't a solid wood, it's plywood with a laminate on top, this still worked really well. |
The oil definitely helped lessen the appearance of scratches and nicks in the wood.
Before....
After.....
 |
| You can still see the scratches a bit, but it definitely made them a lot less noticeable. |
Step 6: Normally you would put the doors and hardware back on.
However, I really liked the look of the exposed wood inside. So I just left the doors off and filled the open cupboards with glasses to put in my dining room!
 |
| Finished!!! |


