Monday, January 7, 2013

Faux Animal Heads-Trend or Keeper???


Even if faux animal heads are just a trend, what a great inexpensive way to update a room.  Also, so easy to mount, for most all you need is a hammer and nail.  So even if these cool additions are simply a short term trend, since they are relatively inexpensive and add so much to a room, why not join in on the trend!  I'm loving the faux animal head wall mounts.  Such a neat detail to add to a room and will add a modern flare to any decor!  These can be found at a variety of home decor stores (HomeSense, Front and Co, etc).  They are made out of various materials from resin, cardboard, metal to porcelain.  The price will vary depending on the material.


head mount
This is the resin animal mount in
 my house, HomeSense  $16


A little paint and an animal mount can really update a room, check out my bathroom.  A great way to update on a budget!
BEFORE......
Our bathroom when we first moved in, a little out-dated:(
AFTER......
black paint
A little black paint, a goat head mount,
and a Home Depot chandelier, and the
bathroom looks a bit more updated without
any structural changes! Same vanity, medicine
cabinet, toilet, bath etc.
Here are some other animal mounts that I love....
animal wall mount
White on white elegant and simple.
horse head mount
Love these ones against the lime green wall,
they really stand out!
Looks great with a variety of different animals, against a contrasting
 wall colour!
faux animal heads
A more rustic look.
faux animal metal head mounts
Metal-gives a more sophisticated look:)


Tuesday, December 4, 2012

My OBSESSION with Wallpaper!


Those of you who know me know my LOVE of wallpaper! Some say it's old school but with all the new modern designs and colours I think it's anything but old school!  Such a great DIY project too, that adds sooo much to a room!
If you are apprehensive about installing the wallpaper don't be!  It's pretty easy.  This is my accent wall in my dining room.

$40 roll of hardware store wallpaper behind my $60 refurbished
thrift store sideboard.
I have a 100 year old home, so I stuck with more classic wallpaper choices but there are amazing more modern ones out there...like zebra prints (one of my favourites!).  I adore tuffed expensive headboards behind beds, but can't afford $1000 + for a headboard, so I opted out of the headboard and decided to use wallpaper to draw attention to the area behind my bed.
  
Demask wallpaper from Home Depot $45.
Demask up close and personal!

Another room, another roll of wallpaper....
Blue Mountain Silk Demask Wallpaper from Rona.
Where to Buy Wallpaper?  Be careful wallpaper can get really expensive so try your local hardware or paint store.  Lots of paint stores have tons of catalogues that you can order from.  Or of course there are tons of online stores that sell wallpaper and often you can buy samples.  I definitely recommend getting samples before you buy wallpaper online.  The samples can look very different from the images online-trust me I know from experience:)   

Here are the tools you need to install wallpaper:
Plastic board/sheet to cut on, an exacto knife, large L shaped ruler, measuring tape, wallpaper tray, smoothing brush, wallpaper sizing-THIS IS ESSENTIAL!! Roll the sizing on the wall with a paint roller before applying your wallpaper.  This will ensure you will be able to remove it in the future without any hassle:)

Apartment Wallpapering:  If you live in an apartment and are worried about wallpapering because of having to take it off when you leave don't be.  If you prepare the wall really well by sizing it before you install the wallpaper it is super easy to take it off.  Back in the day they didn't size the walls before wallpapering, so that's why old wallpaper is sooo hard to get off.  In my dining room I did the wrong wall as the accent wall, and so I ended up taking off the wallpaper about 6 months after applying it.  I bought all gadgets to take wallpaper off with, then when it came time to take it off it just peeled off really nicely without using any removal spray or anything.  I was pleasantly surprised:)

Check out this great video on You Tube for a step by step guide on how to install wallpaper.

Thursday, November 22, 2012

Give an Old Dresser New Life


I love DIY projects and one of my favourite things to do is to take old furniture and refinish it so it looks new again.  Your local thrift store or Craigslist is a great place to find old dressers, side tables, coffee tables etc.  Many items in my home were once old ugly pieces of furniture that nobody wanted and after a little paint and sometimes  new knobs they suddenly came back to life.  Here are some before and after pictures of a dresser I refinished.  
painting furniture
BEFORE
This dresser was buried under a bunch of stuff at my local thrift store.  It was only $40. 
I lightly sanded the dresser, just manually with a foam sanding pad.  This way the paint will adhere better.  I then primed it, also to ensure the paint will adhere better to the dresser.

Thrift store dresser being primed
I always take the cupboards out and paint them so that you can't see the original wood when you open the cupboard doors.  I don't paint inside the cupboards but you could if you wanted!
Still priming away!
I usually give at least two coats of paint.  Letting it dry completely after each coat.  For this dresser I gave it a coat of primer then three coats of paint.  The white paint isn't as forgiving as other colours so that's why I needed so many coats. 
shabby chic
AFTER

refurbished dresser
The dresser works perfectly in the bedroom!
Knobs and Handles:  I left on the original handles and knobs and just painted over them.  Sometimes it is just easier to leave the original ones on, especially if they are the kind that are glued to the dresser.  Ripping the glued ones off could ruin the dresser or leave you with a bunch of patching work.  However, if they are just screwed in it is super easy to replace the old knobs with new ones from the hardware store.

What about Spray Paint?  I used to only use spray paint to paint my furniture, however I felt that the coverage was sometimes blotchy and it would easily crack if I sprayed it too close.  Furthermore, in winter I couldn't paint my furniture outside in the rain, so I needed to paint it inside.  Spray painting inside is never a good idea, you will have little specs of paint everywhere!  So after trial and error, for me regular paint and brush is what works best!

Try it!  I think you will be pleasantly surprised how great your old furniture will look:)


Wednesday, November 14, 2012

How to make a Framed Chalkboard

Want a chalkboard wall but live in an apartment and can't paint the wall? Or maybe you just don't want to make the commitment to a fad like the chalkboard wall. Well there is a simple alternative to get the chalkboard wall look without the commitment: a chalkboard in a frame.  I made a couple for my wedding and now I'm going to hang them on my walls at my house.  Here's a step by step guide on how to make them!      
Start with an old picture frame - or a new one if you want a more modern look. I found these frames in my garage.  They had old paintings in them that I was never going to hang.  If you are looking for frames check Craigslist or your local thrift shop.

Chalkboard
Make an antique frame into a chalkboard
I primed them first, so the paint would adhere better to the frames and to resist chipping. Then I painted them with two coats of paint.  Either use paint you already have, or get a sample size because you don't need much.
A perfect way to bring an old frame back to life:)
I chose white paint but it would look great in a
bright colour against a white wall
For the chalkboard insert I used particle board painted with chalkboard paint.  I measured the dimensions of the inside of the frame to know what size to get the particle board cut to.  I found a large piece of 1/8th inch thick particle board at the hardware store for under $10.  Most hardware stores have cutting shops, so if you don't have a saw, no worries! I only needed three pieces cut so there was no extra charge for cutting it.  However, if you get several cuts made they may charge you extra for each additional cut.
chalkboard particle board
1/8" particle board is the perfect material for your chalkboard.
  Chalkboard paint can be found at most hardware stores or paint shops.
Home depot
LOVING the chalkboard paint!!!
Ok, now to paint the particle board with chalkboard paint.  Do at least three coats, using a paint roller, this way there will be no streaks of paint.  Let it fully dry after each coat.  I did three coats because the more you use the chalkboard the more wear and tear on the chalkboard paint, so the more coats the more durable it will be.
two coats of chalkboard paint
Make sure to let dry at least an hour after each coat
And that's it! Just secure the chalkboard behind the frame, as you would with a painting and hang wherever you desire!  
This one is from my wedding, but would look neat in a kitchen with all the drink specials!
DIY Chalkboard
DIY Chalkboard frame-sorry not the best picture but 
the only one I have:(
And placemats.....can use these for dinner parties or just for everyday.  I used the same 1/8th inch thick particle board, and had them cut into smaller pieces, then I just lightly sanded the edges with a foam sanding pad. 
DIY placemat
Chalkboard placemat

Just a little tip that my friend told me...... if you don't want the writing on the chalkboard to smudge spray the chalkboard with hair spray.  Yes, that's right any hair spray from your vanity cabinet.  This way the writing will not smudge, but you will still have the flexibility of changing the words in the future with a quick wipe with soapy water.  It works!


Sunday, November 4, 2012

Inspirations for my Painted Staircase


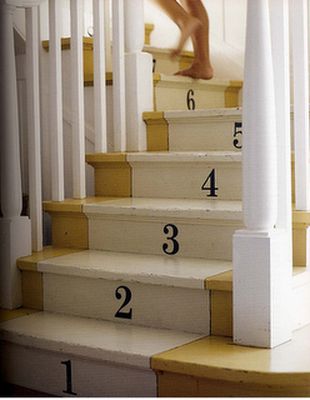
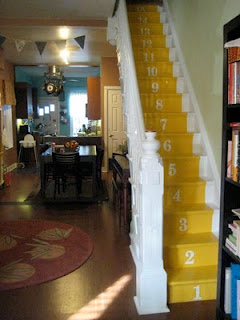
As promised these are the painted staircases that inspired me to do mine!  I love the ones with the numbers up the stairs and am contemplating adding numbers or words to mine.  I hope you too get inspired by these:)
Solid colors with white border, looks like a fake runner-LOVE these!
Painted stair runner

Painted stairway

Painted stair runner


A little extra detail-strips!

Painted stair runner
And words....
Painted stair runner with words


words on stairs


words on stairs
Loving the numbers.....ok so I'm definitely going to add some stenciled numbers to to my steps, I feel like I played it a bite to safe with just the black and white:)
ideas for painted staircase


numbers on stairs

stenciled numbers on staircase

Colored treads and risers....
Ideas for painted stairway

Painted stair runner
Slipped my staircase in here! For a step by step guide see my previous blog!
Some really cool designs....these are a bit too much work for me and I definitely think you need some artistic ability, which I'm lacking in! But they are AMAZING!!!

Piano staircase


Painted design on staircase